

Let’s face it; invoicing is a big headache. Creating a professional invoice is a time consuming task and is not that simple as it appears to be. But FreshBooks provides the best invoicing solutions for all small business owners. It will not only make your task easier but will also keep a track of all your invoices to ensure that you are paid on time.
Let me share my experience of how FreshBooks helped me.
I am a freelance writer. When I got my first paid assignment I was really happy. All the tasks went smoothly from writing to editing and finally publishing. Just one last thing was left:
My editor said, “Send me an invoice and your payment will be submitted.”
I was in a fix.
I had never created an invoice and didn’t know how to go about it. So like all of us mostly do, I started searching on Google on how to create an invoice. But the confusion grew more and more.

Then one of my friends suggested FreshBooks invoicing tool to me. I immediately checked it.
FreshBooks provides the best invoicing solutions for all small business owners. Click To TweetVow! It was like a ray of sunshine in the dark for me. FreshBooks was so easy to use and I finally created my first professional invoice with it. Now I just have to go to my invoicing tool and it helps me with all my tasks.
Take a glance at how to create your free FreshBooks account and your first invoice:
1. Create a FreshBooks account
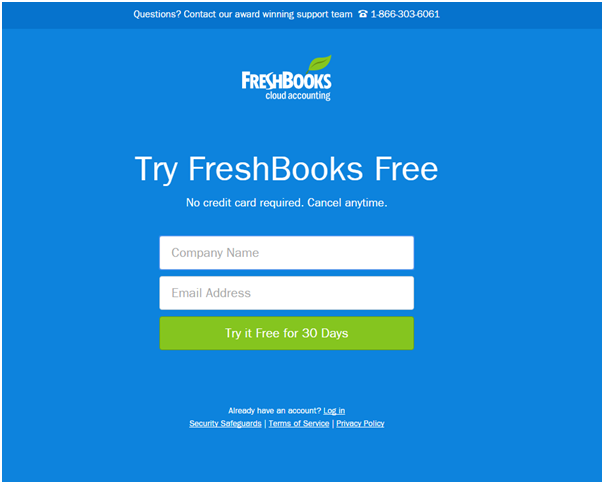
The good news for you is that creating an account with FreshBooks is simple, quick and free. Yes, you heard it right – it gives you a free 30-day trial. And above all, no credit card is required which is usually a big hassle when you sign-up for something new. So just go to the FreshBooks homepage and start creating your account by entering your name and your email address. Isn’t it simple!
Now the second thing is – what when the free trial ends? You can choose for one of their paid plans which are very affordable.
2. Add the name of your first client
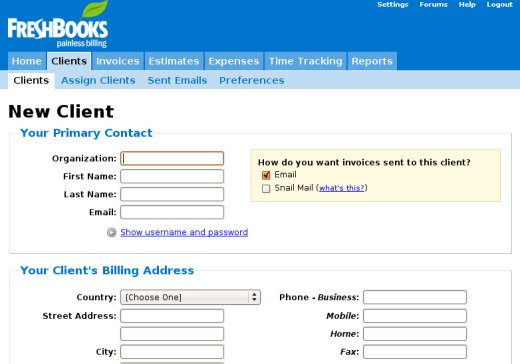
Once you have created your account, the next step is to add the name of your client. The only details you need to fill in are the name of the organization you want to send your invoice to and the email id. Make sure that you enter the right email – whether you want to send the invoice to the editor or to the accounts department. Save the details and head on.
3. Create an invoice
After you have saved the details, you are ready to create your invoice. Just click “Create an invoice for this client.”

Your invoice number and date may already be filled. You can change them according to your requirements.
Now you need to fill in few details:
a) Task:A task is the kind of work you have done for which you are sending the invoice. For instance it could be an article or editing work or proofreading or a blog etc. Define the task for every invoice you create.
b) Time Entry Notes:Fill in all the necessary details about your assignment that may be of help to your editor.
c) Rate and Hours:Depending on the way you are being paid – whether on an hourly basis or for a complete project, enter your working hours and the total amount.
d) Add terms and notes: This field is optional but you can use it to figure out your terms with the client. In the notes box you can add a friendly note saying that you enjoyed working with them and will like to work together in future as well. A simple note of appreciation will help you being paid faster.
5. Hit send
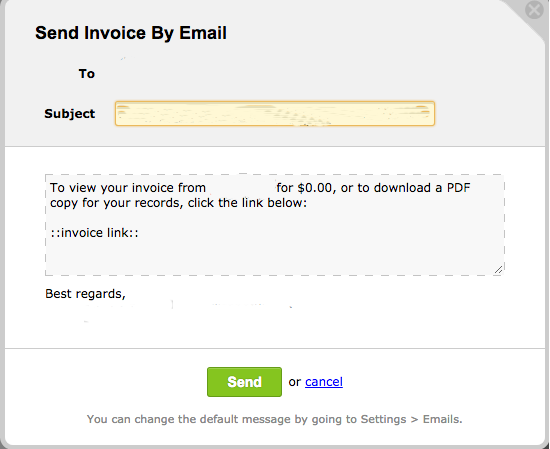
Double-check all your details and hit send. After you have clicked send by email, you will see a pop-up on your screen. Review the email subject and the body of the invoice and if you want to make any changes, you can edit it.
6. Receive your payment
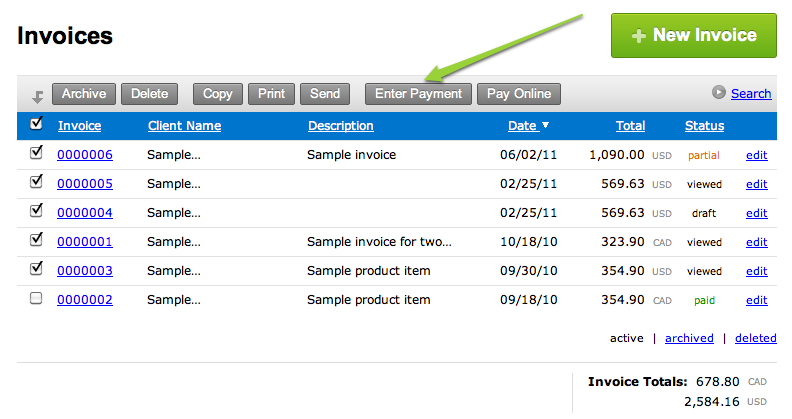
Now the last step is to wait for your payment. There are certain other things you can do to track the details or remind your client about your payment:
- Set payment terms, such as a 10% late fee after 30 days. When you write your terms, click Set Default Terms > Late Payment Fees > Enable Late Payment Fees for all invoices.
- Log into your FreshBooks account to check if the client has viewed your invoice. If not, then resend it.
- Automatically send late payment reminders. Go to settings > emails > late payment reminders.
All set to create your first invoice? Go for a free trial and send a demo invoice to yourself by following the above steps and see how it looks like.
Check out this video to create your first invoice in FreshBooks
So simple, right? So what are you waiting for? Go to FreshBooks right away and get going!
Enjoy Invoicing!


Hi Sonal,
You’ve broken down FreshBook nicely. I’ve never used it, but it seems simple enough. And the animation you included made it clearer. I’ll certainly look into it.
Hi Terrence
FreshBooks is one of the best online platforms. you should definitely try it and am sure you will love it. Get the direct signup link on my blog.
Thanks for your wonderful feedback.
Have a nice day!
Hi sonal di
Great one 🙂
Fresh books is one of the the best online book-keeping platforms in UK. So all you have represented is very informative and detailed. Any business owner will have to spend a lot of money on lack of a good accounting system.
Nice to see you writing about this. Good luck.
Vashishtha recently posted…Hosting24 Discount Coupons $24 Discount on Any Hosting Plan
Hi Vashishtha
Glad that you liked the post. Absolutely, FreshBooks is one of the great platforms for small business owners. It makes the task so simple and easy.
Thanks for writing in
Have a nice day!
Hi Sonal,
Thank you for this information on Fresh books.
It’s like a ray in the dark for me too.
I will keep this info on file.
Good article.
Hi Kathryn
Thanks for your feedback. FreshBooks is really a great and simple way to create invoice. Do try it out. You can get the direct link on my blog.
Keep writing in
Have a nice day!
Hi Sonal,
This is great, I didn’t know you can do that in Facebook.
Thank you for sharing, very helpful!
Hi Emi
Thanks for your feedback.
Have a nice day!
That’s cool Sonal,
I have always thought about this as a future headache especially when I have something to sell apart from my freelance writing service. I will keep freshbooks at the back of my mind.
I think I will need their service very soon
Thanks for this informative post
Hi Toby
I agree with you. As a freelancer creating invoices is a big headache. But FreshBooks is really good. I have been using it from a while.
Whenever you decide to use it, do follow the link on my blog.
Thanks fro writing in
Have a nice day!
Thanks for sharing! Saving time on invoicing means you can free up more time that could be better spent earning more payments! Having an online system is also great when it comes to tax returns etc!
Mark – Hull Accountant recently posted…When is a Van not a Van?
Hi Mark
Thanks for visiting my blog and sharing your views. Invoicing is very times consuming. FreshBooks is really the best option I have ever come across. Hope you like it.
Have a nice day!
These are great tips! Creating an invoice certainly can be a tricky task, but resources like this make it much simpler. Thanks so much for sharing your advice!
Hi Morgan
Thanks for visiting my blog and sharing your views. Hope it helps you.
Have a nice day!